Wednesday, 31 December 2014

// // Leave a Comment

Windows Xp All Shortcuts Key


ALT+- (ALT+hyphen) Displays the Multiple Document Interface (MDI) child window's System menu ALT+ENTER View properties for the selected item
 

 ALT+ESC Cycle through items in the order they were opened ALT+F4 Close the active item, or quit the active program
ALT+SPACEBAR Display the System menu for the active window
ALT+TAB Switch between open items
ALT+Underlined letter Display the corresponding menu
BACKSPACE View the folder one level up in My Computer or Windows Explorer
 
 CTRL+A Select all
CTRL+B Bold
CTRL+C Copy
CTRL+I Italics
CTRL+O Open an item
CTRL+U Underline
CTRL+V Paste
CTRL+X Cut
CTRL+Z Undo
CTRL+F4 Close the active document
CTRL while dragging Copy selected item
CTRL+SHIFT while dragging Create shortcut to selected iteM
CTRL+RIGHT ARROW Move the insertion point to the beginning of the next word


 CTRL+LEFT ARROW Move the insertion point to the beginning of the previous word
 
CTRL+DOWN ARROW Move the insertion point to the beginning of the next paragraph
 
 CTRL+UP ARROW Move the insertion point to the beginning of the previous paragraph
 
 SHIFT+DELETE Delete selected item permanently without placing the item in the Recycle Bin
 
 ESC Cancel the current task
F1 Displays Help
F2 Rename selected item
F3 Search for a file or folder
F4 Display the Address bar list in My Computer or Windows Explorer
F5 Refresh the active window
F6 Cycle through screen elements in a window or on the desktop
F10 Activate the menu bar in the active program
SHIFT+F10 Display the shortcut menu for the selected item
CTRL+ESC Display the Start menu
SHIFT+CTRL+ESC Launches Task Manager
SHIFT when you insert a CD Prevent the CD from automatically playing
 
 WIN Display or hide the Start menu
WIN+BREAK Display the System Properties dialog box
WIN+D Minimizes all Windows and shows the Desktop
WIN+E Open Windows Explorer
WIN+F Search for a file or folder
WIN+F+CTRL Search for computers
WIN+L Locks the desktop
WIN+M Minimize or restore all windows
WIN+R Open the Run dialog box
WIN+TAB Switch between open items


HIdden Run Commands

Hidden Bluetooth software in windowsXp:

>START
>RUN
>FSQUIRT  
Restoring a Lost Desktop-


>Start
>Run
Type a period " . "
Then press Enter
R You Playing Game In Ur pc?
 
Want To Do It Advance?
Try This Trick
GoTo
-run
-type joy.cpl
DONE!
If ur PC is hanged then do this.


Press shift+ctrl+esc
n den click on 'END TASK'
ur PC is runing now

create folder without name

>select any folder
>rename it
>press alt & type 0160
>enter
Amazing trick for use


Windows Backup Utility if installed
go to run
type ntbackup
ok
Now use backup

Disable CD Autorun
1) Click Start, Run and enter GPEDIT.MSC
2) Go to Computer Configuration, Administrative Templates, System.
3) Locate the entry for Turn autoplay off and modify it as you desire.


Remove the Recycle Bin from the Desktop
If you don't use the Recycle Bin to store deleted files , you can get rid of its desktop icon all together.
Run Regedit and go to:
HKEY_LOCAL_MACHINE/SOFTWARE/Microsoft/Windows/CurrentVersion/explorer/Desktop/NameSpace

Click on the "Recycle Bin" string in the right hand pane. Hit Del, click OK.

Hide 'User Accounts' from users
Go to Start/Run, and type:
GPEDIT.MSC
Open the path
User Config > Admin Templates > Control Panel
doubleclick "Hide specified Control Panel applets"
put a dot in 'enabled', then click 'Show"
click Add button,
type "nusrmgt.cpl" into the add box

Turn off Welcome screen
Open User Accounts in Control Panel.
Click Change the way users log on or off
Read More
// // Leave a Comment

Windows All Run Command

                                                 
-----------------------------------------------------------
START >> RUN
Accessibility Controls
access.cpl
Add Hardware Wizard
hdwwiz.cpl
Add/Remove Programs
appwiz.cpl
Administrative Tools
control.exe admintools
Automatic Updates

wuaucpl.cpl
Bluetooth Transfer Wizard
fsquirt
Calculator
calc
Certificate Manager
certmgr.msc
Character Map
charmap
Check Disk Utility
chkdsk
Clipboard Viewer
clipbrd
Command Prompt
cmd
Component Services
dcomcnfg
Computer Management
compmgmt.msc
Date and Time Properties
timedate.cpl
DDE Shares
ddeshare
Device Manager
devmgmt.msc
Direct X Control Panel (if installed)
directx.cpl
Direct X Troubleshooter
dxdiag
Disk Cleanup Utility
cleanmgr
Disk Defragment
dfrg.msc
Disk Management
diskmgmt.msc
Disk Partition Manager
diskpart
Display Properties
control.exe desktop
Display Properties
desk.cpl
Display Properties (w/Appearance Tab Preselected)
control.exe color
Dr. Watson System Troubleshooting Utility
drwtsn32
Driver Verifier Utility
verifier
Event Viewer
eventvwr.msc
File Signature Verification Tool
sigverif
Findfast
findfast.cpl
Folders Properties
control.exe folders
Fonts
control.exe fonts
Fonts Folder
fonts
Free Cell Card Game
freecell
Game Controllers
joy.cpl
Group Policy Editor (XP Prof)
gpedit.msc
Hearts Card Game
mshearts
Iexpress Wizard
iexpress
Indexing Service
ciadv.msc
Internet Properties
inetcpl.cpl
Java Control Panel (if installed)
jpicpl32.cpl
Java Control Panel (if installed)
javaws
Keyboard Properties
control.exe keyboard
Local Security Settings
secpol.msc
Local Users and Groups
lusrmgr.msc
Logs You Out Of Windows
logoff
Microsoft Chat
winchat
Minesweeper Game
winmine
Mouse Properties
control.exe mouse
Mouse Properties
main.cpl
Network Connections
control.exe netconnections
Network Connections
ncpa.cpl
Network Setup Wizard
netsetup.cpl
Nview Desktop Manager (if installed)
nvtuicpl.cpl
Object Packager
packager
ODBC Data Source Administrator
odbccp32.cpl
On Screen Keyboard
osk
Opens AC3 Filter (if installed)
ac3filter.cpl
Password Properties
password.cpl
Performance Monitor
perfmon.msc
Performance Monitor
perfmon
Phone and Modem Options
telephon.cpl
Power Configuration
powercfg.cpl
Printers and Faxes
control.exe printers
Printers Folder
printers
Private Character Editor
eudcedit
Quicktime (If Installed)
QuickTime.cpl
Regional Settings
intl.cpl
Registry Editor
regedit
Registry Editor
regedit32
Removable Storage
ntmsmgr.msc
Removable Storage Operator Requests
ntmsoprq.msc
Resultant Set of Policy
rsop.msc
Resultant Set of Policy (XP Prof)
rsop.msc
Scanners and Cameras
sticpl.cpl
Scheduled Tasks
control.exe schedtasks
Security Center
wscui.cpl
Services
services.msc
Shared Folders
fsmgmt.msc
Shuts Down Windows
shutdown
Sounds and Audio
mmsys.cpl
Spider Solitare Card Game
spider
SQL Client Configuration
cliconfg
System Configuration Editor
sysedit
System Configuration Utility
msconfig
System File Checker Utility
sfc
System Properties
sysdm.cpl
Task Manager
taskmgr
Telnet Client
telnet
User Account Management
nusrmgr.cpl
Utility Manager
utilman
Windows Firewall
firewall.cpl
Windows Magnifier
magnify
Windows Management Infrastructure
wmimgmt.msc
Windows System Security Tool
syskey
Windows Update Launches
wupdmgr
Windows XP Tour Wizard
tourstart
Wordpad
write
Try them out..
Read More
// // Leave a Comment

How Can We Bypass HTMLEntities Tutorial


How Can We Bypass HTMLEntities Tutorial ?
The Security researcher Paulos Yibelo share with HAOW that how he bypassing htmlentities().
Well I don’t know how to break it down for you, you just can’t (if the function is used properly and exactly where it should). But it’s more probable that most developers don’t use it the right way, since it’s like a norm for some developers to not use built-in functions properly :P. So I will talk about some of the cases I came up while pentesting. htmlentities() and htmlspecailchars() are functions mainly developed to filter out cross site scripting attacks.

But I can promise you that you can build a better function if your user input is massive since that’s when most exploitation scenarios begin. How? Well, the functions html entity the characters < , > “ and ‘. So without those there seems there is no XSS. Or isn’t really? Well, I can think of one. Something like javascript:alert(1); will be executed since none of the characters in it are filtered to be html entityed… but there is a limitation to this. Without using “> or any similar technique we will not be able to break out of the attribute we are inside.


Also the value attribute in html is not vulnerable since it only accepts strings and well we need scripts that can execute… something like href, onclick would do… but who would put such a foolish mistake right? Well you wouldn’t believe if I told you even big companies like Facebook does.
Have a code like?

                               print '<img src="'.htmlentities("$url").”';
or even   

          print "<a href='".htmlentities($url)."'>Click Here</a>"; 

“javascript:alert(1);” will bypass it because it doesn’t contain the characters that will be filtered. But notice a limitation here? Our code will only execute if user clicks the Click Here button. So that’s a huge limitation. Or is it? The html code will become something like
 

             <a href='javascript:alert(1);'>Click Here</a>

 But we need to break out of the href tag and execute a more malicious javascript. But how? If we try to break out of it using ‘> it won’t work since both those characters are filtered out… and the code will become something like


<a href='javascript:alert(1);&quot;&gt;'>Click Here</a>

Right? Well not exactly. Htmlentities comes with single quote ( ‘ ) not filtered by default and you have to specify a special switch called ENT_QUOTES to declare that. So the real output when values like “javascript:alert(1);’>” is given

<a href='javascript:alert(1);'&gt;'>Click Here</a>

A hope! We broke out of the attribute so giving values like

javascript:alert(1);’ onfocus=alert(1); autofocus

will output html source like
 

Read More

Tuesday, 30 December 2014

// // Leave a Comment

MX Player Pro 1.7.35 Cracked APK For Andorid December 2014


http://adfoc.us/2601391


THIS IS THE AD-FREE VERSION OF MX PLAYER. MX Player – The best way to enjoy your movies.
Features
HARDWARE ACCELERATION – Hardware acceleration can be applied to more videos with the help of new H/W decoder.


http://adfoc.us/2601391

MULTI-CORE DECODING – MX Player is the first Android video player which supports multi-core decoding. Test result proved that dual-core device’s performance is up to 70% better than single-core devices.
PINCH TO ZOOM, ZOOM AND PAN – Easily zoom in and out by pinching and swiping across the screen. Zoom and Pan is also available by option.
SUBTITLE GESTURES – Scroll forward/backward to move to next/previous text, Up/down to move text up and down, Zoom in/out to change text size.
KIDS LOCK – Keep your kids entertained without having to worry that they can make calls or touch other apps. (plugin required)

Subtitle formats
  • DVD, DVB, SSA/ASS Subtitle tracks.
  • SubStation Alpha(.ssa/.ass) with full styling.
  • SAMI(.smi) with ruby tag support.
  • SubRip(.srt)
  • MicroDVD(.sub/.txt)
  • SubViewer2.0(.sub)
  • MPL2(.mpl/.txt)
  • PowerDivX(.psb/.txt)
  • TMPlayer(.txt)
  • Teletext
  • PJS(.pjs)
  • WebVTT(.vtt)

Andorid Mx Player Pro  Apk
Read More
// // Leave a Comment

ISO Extract.Mount.Convert.Open.Creater ALL IN ONE WinISO Full Crack December 2014

                                                                        
WinISO is a professional CD/DVD/Blu-ray Disc image file utility tool that you can open, create, edit, extract, mount, convert ISO files and other image file formats. It can also make bootable CD/DVD/BD and burn ISO image file to CD/DVD/Blu-ray Disc. Furthermore, it’s capable of processing almost all CD/DVD/BD image files, including ISO and BIN. WinISO provides a comprehensive solution.


http://adfoc.us/2601391                                                                                


Features:

  • ISO Editor: Open and edit ISO files
  • ISO Extractor: Extract ISO files and CD/DVD/Blu-ray Disc image files
  • ISO Converter: Convert image files between ISO/BIN and other formats
  • ISO Burner: Burn ISO image file to CD/DVD/Blu-ray Disc and burn image files on-the-fly
  • ISO Mount: Mount ISO image files
  • Bootable ISO Maker: Make bootable CD/DVD/Blu-ray Disc images
  • Backup CD/DVD/BD as image files from CD/DVD/BD Drive
How to crack?
  1. Download and install WinISO
  2. Open WinISO Crack.exe and click PATCH
  3. Enter whatever serial key if asked
  4. Done. Enjoy!
WinISO EXE Setup
WinISO Crack


Read More

Sunday, 28 December 2014

// // Leave a Comment

How To Install Kali Linux And Other OS In Vmware VirtualBox Full Tutorial December 2014

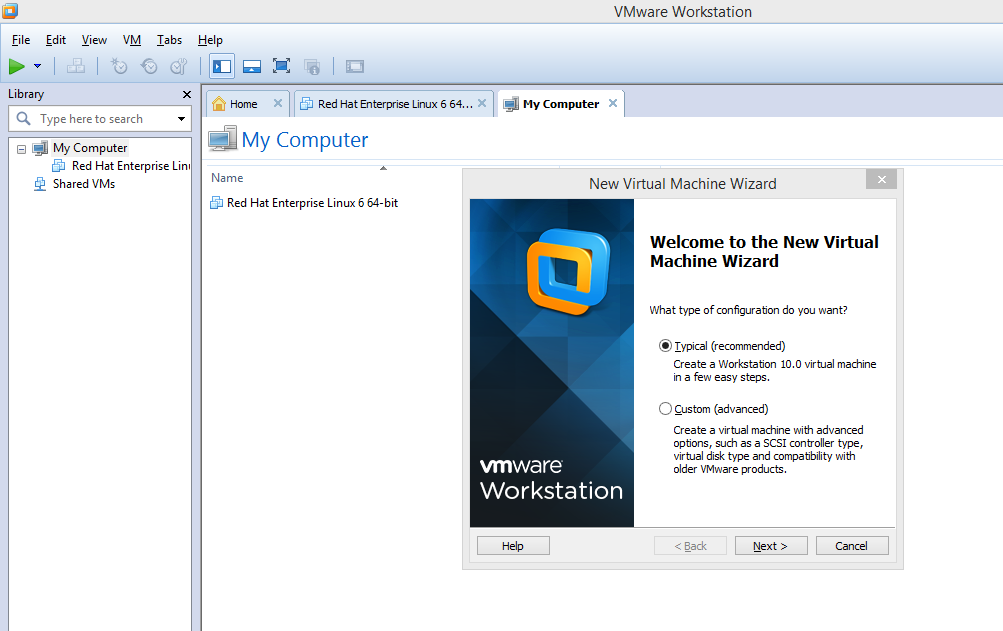
First, Let’s create a  new virtual machine. Open Virtualbox and go to “Machine” and click on New or hold “CTRL+N”. The below window will pop up. Choose the name for your virtual machine. I named it Kali 1.0.9. Choose the OS type as “Linux” and version as “Debian(32 bit)” ( since I am installing 32bit version.). Click on Next


a


Allot the memory of  atleast 512MB. Click on Next.

kali9.2

Select the option “Create a virtual hard drive now”. Click on “Create“.

kali9.3

If you want to use your virtual machine  image with other virtualization software like Vmware in future, select vmdk image otherwise select vdi image. Since I regularly use this image with Vmware also, I selected vmdk. Click on “Next

kali9.4

Select the option “Dynamically allocated”. This selection allots the memory according to the requirement. Click on “Next”.

kali9.5

Allocate  atleast 15GB of hard disk to the virtual machine. Click on “Create“.

kali9.6

The virtual machine is created. It’s time to boot into our operating system. Before booting into Kali Linux we need to make  a few changes. Go to “Settings” as shown below.


kali9.7

Go to System>Processor and enable the option “Enable PAE/NX” and click on OK.

v8a

Start the virtual machine and browse to the location of the iso file of Kali Linux and click on “Start


kali9.8

Select the option “Install”. Hit “Enter”

kali9.9

Choose the language as “English” or as applicable and select the location of your choice. I chose “India.”

Kali9.9a

Choose your keyboard.

Kali10

The system will load some additional components and then prompt you for the hostname. Enter hostname and Activate the “Continue” button.

Kali12

You can choose the domain name if you want. However it is optional. Activate “Continue

Kali13
The system will prompt you to set the root password. Enter the root password and click on “Continue.”
Kali14

Re-enter the password to confirm. Click on “Continue.”

Kali15

The system will prompt you to partition disks. If you are not sure what to do or a novice, choose “Guide-use entire disk.” option.

Kali16

Confirm the disk partitioning.

Kali17

Select the partitioning scheme of your choice. If you are a new user choose the first option as recommended

Kali18

Then you will be given an overview of current settings. Choose the option “Finish partitioning and write changes to disk.”

kali19

Select the option “Yes” to write the changes to disk.

kali20

The installation of the system will start as shown below.

kali21

In the middle of the process, you will be prompted if you want to use a network mirror. select “No”.

Kali22

In the midst of the process, you will get a blue screen as shown below for a rather long time. Don’t panic and have patience. The process will continue again by itself.

kali23

Then system will ask you whether to install the grub loader to MBR. Click “Yes”  and the installation will continue.

kali24

When the installation is completed, the system will ask you to reboot into the system. click on “Continue”.

kali25

The system will reboot into the operating system as shown below. Enter the username as “root” and the password as configured previously.
         
                                                             Your Work Complete 

kali27

Now comes the most interesting but contentious part. Yes, installation of guest additions. But don’t worry. you will have a final solution at the end of the article.

kali28

Install guest additions by going to “Devices>install guest additions”. A cd image will appear on the Kali desktop. Double click on the cd image. A message will be displayed as below. Click on “Run”.

kali29

Most probably you will get an error message as shown below.

kali30

Before we do anything, let’s alter the sources.list file. For those who don’t know, sources.list file is a file where system  has list of repositories where the OS  should be checking for updates or installing new programs. Open a terminal. Type the command locate sources.list to search for sources file. We are interested in the one located in the “apt” directory. We will open this file using vi editor. Type command vi /etc/apt/sources.list as shown below.

kali31

The Vi editor will open the file as shown below.

kali32

If you are new to vi editor, type i once to get into insert mode, then add the following three lines given.
deb http://http.kali.org/kali kali main non-free contrib
deb-src http://http.kali.org/ kali kali main non-free contrib
deb http://security.kali.org/kali-security kali/updates main contrib non-free
as shown below. Once you are finished, tap the esc key to get out of insert mode,then type :wq to save and exit the file. What we have just done is instructed the system to look for headers in the right place while installing guest additions.


kali34

Once you came out of the vi editor, type the command apt-get update && apt-get install -y linux-headers-$(uname -r)  to install the headers.

kali35

You will see the below processes taking place.

kali36

Once it is finished, open a terminal. Type the command “pwd” to see the current directory.  Navigate to the “media” directory where our virtualbox guest additions CD is mounted by typing commands “cd/” and then “cd media”. Type “ls” to see where our guest additions  is mounted. It’s mounted at directory “cdrom”. Navigate to that directory by typing command “cd cdrom“.  Type the command “ls” once again to see the contents of the directory.

kali37

We are interested in the file “VBoxLinuxAdditions.run”. Check the permissions of this program by typing command “ls -l VBoxLinuxAdditions.run”. We can see that the root user doesn’t have “execute” permissions on this file. First copy this file to the root directory by typing command  cp VBoxLinuxAdditions.run /root. Now go to root directory by typing command cd /root. Change the permissions of this file by typing  command chmod 755 VBoxLinuxAdditions.run. Now let’s check if the permissions have been changed. Type command ls -l  VBoxLinuxAdditions.run. We can see below that now we have execute permissions over this file.

kali38

kali39

Now let’s run this program. Type command ./VBoxLinuxAdditions.run. Guest additions would be successfully installed as shown below. Now restart the system by typing command “shutdown -r now“.

kali42

Hope this was helpful. If you face any problems while installation, please leave a comment below.


Kali Linux Direct Link
http://adfoc.us/26013953873339

Direct Link OF Vmware 10.0
http://adfoc.us/26013953876010


Read More